
Yo yo!
So this is for all of the people who have asked me about simple photography basics in the past! Now you don’t have to rack your brain about what I said – just come back here for a refresher 😉
But what is it that you should know when you want to start taking photos without using the AUTO mode? Well I have a few things for you! Everything I will be discussing will be applicable to when you are in Manual mode with your DSLR (it’s the M on the navigation dial!) You will also have to look at your manual (haha) to figure out how to change each setting I will talk about below because every camera is different, but there are usually dials that rotate left and right for aperture and shutter and then a button that says ISO for ISO.
(everything I learned is from trial and error & www.digital-photography-school.com 🙂 )
The first thing I want you to know is called the Exposure Triangle. The exposure triangle consists of 3 things (no duh, sherlock):
Shutter Speed
Aperture
and ISO
Shutter Speed is the clicking sound the camera makes when you take a picture. It’s the amount of time that light is allowed to enter the camera while the shutter is open. It’s measured in speeds as slow as seconds but as fast as 1/4000 of a second! The faster the shutter, the more frozen things become and the darker the picture because the shutter is only open for so long – or I guess short, in this instance haha and the slower the shutter, the more blurry and bright things will be because the shutter is open longer.
quick re-cap: the smaller the number (i.e. 1/60) the slower and brighter, the bigger the number (i.e. 1/4000) the faster and darker. (let’s not get too technical here math wizards ;P)
The second one is aperture. Aperture is the size of opening when the shutter is open. It’s this picture you see everywhere when googling aperture:
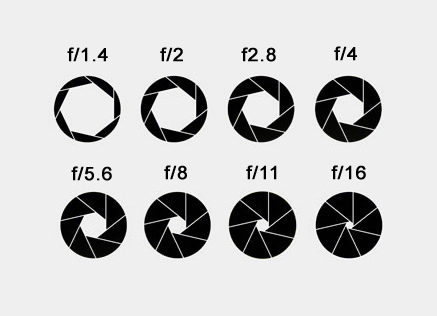
(not my photo, got it from google no copyright infringement intended!)
Aperture is measured in f/stops, which are the numbers you see above! And this guy can get a little complicated because the numbers are bit backwards for our brains. Just remember, the smaller the number, the bigger the opening and vice versa!
According to someone who posted on wikipedia: “More specifically, the aperture and focal length of an optical system determine the cone angle of a bundle of rays that come to a focus in the image plane.” And that’s correct, but how about in english yeah? 🙂
So aperture determines the amount of blur in the photo. If you take a photo of someone standing at f/1.4, the person will be more in focus than the background – the background will be all blurred and creamy. But if you take the same photo at f/22 pretty much everything will be in focus, including more of the background. But remember, aperture isn’t just about blur, it’s about the size of the opening too. So if you want more things in focus and you bump up the aperture to match that, you also need to remember that you’re making size of the opening smaller – which makes the photo darker. That’s why knowing the exposure triangle is so important because you can still get the photo you want, but without having to compromise (in ideal lights situations) what you want to prioritize.
The last thing is ISO. I’m not really sure what that stands for, pretty sure it’s a light sensitivity organization haha but that’s beside the point 😛
Well, sort of.. ISO is actually the amount of sensitivity the camera, with the shutter open, experiences but whether or not it’s an acronym is beside the point. ISO is measured in hundreds +. It usually starts at 100 and then can go as high as the body was built for (my current DSLR body can go up to something like 12800). Having a higher ISO means the image will be brighter. So if you’re in a low-light situation but need a fast shutter because of movement, you can bump up the ISO and then get that image with the settings you need. But the only thing with that, is that a higher ISO causes more grain in the photo. So when you see photos that look super grainy (usually low-light situations) it’s because of a high ISO.
Digital Photography School uses a good metaphor of a window to help remember everything, so definitely check out their article here: https://digital-photography-school.com/learning-exposure-in-digital-photography/.
The second thing I want you to know, is that not all lenses (and camera bodies for that matter) offer the same options in terms of ISO levels and aperture levels. Most basic DSLRs come with a kit lens with a starting aperture of 3.5. So the background blurry-ness of most portrait images you see cannot be achieved (as simply as just taking the photo) the way having a lens that goes to around 1.4 or 1.8 can do! I said “as simply as just taking the photo” because it is still possible to achieve a blurry look, but you have to do some thinking and experimenting to achieve it. The easiest way to still get that blur despite a high aperture is to place your subject as far away from the background as possible. So for instance if you want trees to be blurry in the background, you can’t place your model right next to it with an aperture at 3.5, you and the model will have to move away from the tree some distance before it will become blurry! Whereas with a 1.4 lens, you can be pretty close to the tree and still get that blurry, creamy affect 🙂
If you want to dive into portrait photography, I definitely suggest investing in a 50mm or 85mm lens! Stick to apertures that are 1.4 or 1.8 🙂 These lenses are fixed lenses which means they don’t zoom (you would have to move yourself in order to get closer or further from the subject as opposed to just zooming in or out) but they offer some amazing capabilities when you do invest in one! I don’t have any zoom lenses in my arsenal and I never have since selling my kit lens.
If you have any questions feel free to message me! 🙂 I’m happy to help out and will totally help whenever you need it! But what I found to help the most was just practice. It will be frustrating in the beginning because you have to remember which ones do what and at what time and also what it means for the photos when the numbers are higher and lower, but the more you practice, the more second-nature it becomes!!
Anyway, I hope this helped you guys!
Have a great weekend ❤
Katelyn Rose
